|
|
|
|
|
|
|
|
|
|
|
In This Tutorial:
Wrapping polymer clay onto steel rods,
continue on to build or buy multi-cutter.
You can DO this, and it's worth
learning!NEXT IN THIS
TUTORIAL:
~Using the Reducerator to make square
rods!
Never tried it more than once...
but then again, now that I have the
SquisherAtor done and peripherals
tuned up,...triangles, trapezoids...hmmm
June 07/07
Page updated: Jn.18
|
|
|
|
|
|
|
|
Sheet out your clay as usual.
TOTAL elimination of air bubbles
will make a difference in the
end.
I use white in most cases because
it brightens up the millefiore
colors added later...if desired.
*MAKE SURE YOU USE SOME OF YOUR
SOFTEST CLAY FOR THE FIRST FEW
TRIES. IF THE CLAY DOESN'T STICK
TO THE ROD, YOU'RE GONNA BE ANGRY!
...in which case you would polish,
even sand any possible residue
or contaminants from the
smooth, straight rod
and...
Meet you back here!
|
|
| |
|
|
|
|
|
|

|
This is about the size to start
with.
Of course, if you're planning
on making larger beads, then you'll
make these starting strips wider
to allow for more wraps around
the rod.
This is a Jamie Oliver 175mm
roll-out. More on THAT will be
fun.
|
|
|

|
Run your strips through the machine
at a thin setting. Thicker settings
will make the clay too un-cooperative
for wrapping around small rods.
Take special care not to stretch
the strip. Even small stretches
will make your rods inconsistently
coated(different areas of the
rod will have more or less diameter).
|
|
|

|
The length of your strips depends
on the length of the rods you
plan on wrapping. Trim off the
ends. 30 cm clay good for 34cm
rod.
SEE
Article:
|
|
|

|
The rough edges from your machine,
and air bubbles underneath your
strip when you laid it down
must be eliminated.
Slight adhesion to the work surface
will help you also to make your
bevel cut(next step).
|
|
|

|
It takes practice not to cut
your table surface.
You might want to try this on
a sheet of glass, but the higher
adhesion can cause other difficulties.
You will quickly find that this
is the touchiest part of the process,
so maybe practice practice practice
this step before wasting your
nicely laid-out strips.
My pinkie maintains even height.
These are 30cm.
|
|
|

|
After some practice, you will
have nice consistent bevel cuts.
Trust me, you want to get this
right. The straighter your bevel,
the easier it will be to wrap
your rods.
Furthermore, when you go to lift
your bevelled edge to put the
rod underneath, be especially
careful not to mar the leading
edge of the clay. It is this leading
edge that provides adherence to
the metal.
|
|
|

|
Using a fairly sharp lifter,
slide along the work surface at
such an angle that the clay remains
lifted slightly.
Again, be careful that your newly
cut bevelled edge lifts as cleanly
and sharply off the table as possible.
This makes your wrap easier in
the end.
A nice, straight, smooth scrape
when you lift the edge of the
clay will pay off when you go
to align the clay with the rod
that you're going to stick it
to.
|
|
|

|
Using a slight back-spin on the
rod, slip it under your lifted
clay so that it lines up, just
barely hidden under the bevelled
edge.
|
|
|


|
Carefully now!
This is where the 'rubber meets
the road'.
If the clay is not adhering successfully
to the rod, then you're going
to have to start over with more
softener in your clay, or maybe
your bevel was too 'steep' of
an angle to wrap gently around
the first arc on the rod.
|
|
|
|
|
|
|

|
Okay, you've gotten the edge
of your clay sticking nicely along
the rod!
Because of the missing pic next,
I'll quickly say to lift the strips
with pallette knife, flip the
clay/rod toward you, and locate
a peice of thick, clear plexiglas
of slightly extra length.
Start the wrapping with fingers
first unless you are positive
that the clay as sticking well
to the rod.
More soon. Sorry about that!
|
|
|

|
POSSIBLE
PITFALL!!
Okay, if you see this happening
you've got trouble. There is not
much sense in going further!!
Go back and start with softer
clay.
|
|
|

|
Okay, you've gotten the edge
of your clay sticking nicely along
the rod!
Because of the missing pic next,
I'll quickly say to lift the strips
with pallette knife, flip the
clay/rod toward you, and locate
a peice of thick, clear plexiglas
of slightly extra length.
Start the wrapping with fingers
first unless you are positive
that the clay as sticking well
to the rod.
More soon. Sorry about that!
|
|
|

|
Okay, you've gotten the edge
of your clay sticking nicely along
the rod!
Because of the missing pic next,
I'll quickly say to lift the strips
with pallette knife, flip the
clay/rod toward you, and locate
a peice of thick, clear plexiglas
of slightly extra length.
Start the wrapping with fingers
first unless you are positive
that the clay as sticking well
to the rod.
More soon. Sorry about that!
|
|
|


|
Now, you must undercut the leftover clay to match the first
cut on the inside of the rod...see next photo...
|
|
|

|
Roll it smooth.
You want to touch your thumbs together when you do this
to avoid 'skewing' the rod and causing the clay to break
its bond with the rod.
|
|
|


|
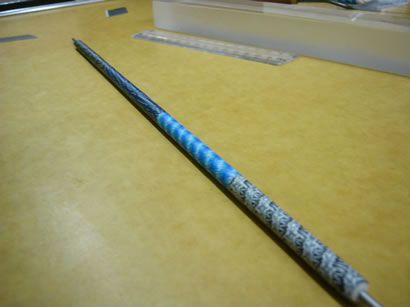
Once smooth, add your millefiore!!
Then smooth again.
|
|
|
|
You can do multiple designs on any one rod of course,
|
|
|

|
You may cut whatever size of bead you like one by one,
or you can ask about building or buying a multicutter.
They're a bit expensive, so I suggest you build your own!
This is a 5mm cutter that I designed, and have not changed
the blades on it in almost a decade!!
|
|
|
|

Woops! Too late for that!
|
|
|

|
We will build one of these soon.
This is my '3mm' Cutter.
|
|
|
|
|
|
Clay Lessons
Care and control
A Polymer Primer
|
Clay
Tech
Advanced Tools
Reduction 411
|
Tool-
making!
It's one thing making them, but
another thing to handle a camera...
I'm working on it!
|
and...
|
|
|
|
|
|
|
| |
|
|
|
|
|
|
|
|


